Let’s Make An IMPACT
Chapter 3: Scheduling and Appointment Sequence
Taking your next steps
In this chapter, we will be taking you through your next steps to integrating Invisalign into your practice. This chapter is made up of…
- Chapter 1: Getting Started
- Chapter 2: Submitting a case to Invisalign and using IMPACT
- Chapter 3: Scheduling and appointment sequence
- Chapter 4: The consultation
- Chapter 5: Aligner delivery appointment
- Chapter 6: Interproximal reduction appointment
- Chapter 7: Refinement “additional aligners” scan appointment
- Chapter 8: Refinement “additional aligners” delivery appointment
- Chapter 9: Debranding and retention
It is recommended to allot 30-45 minutes for the Consultation Appointment. This will give the team adequate time to take and review records as well as to educate the patient about their specific concerns and about the Invisalign process. Other than patient compliance, communication is the most important element of providing a successful Invisalign journey for your patients.
At the “Aligner Delivery Appointment” your office will be delivering ALL the aligners to the patient. This has 2 major advantages:
- Reduces the need to create office storage space for all the Invisalign boxes
- Allows flexibility in scheduling the patient
The Invisalign treatment plans will be staged in one of the following 3 increments:
- 24 Active aligners + 2 passive aligners
- 36 Active aligners + 2 passive aligners
- 48 Active aligners + 2 passive aligners
Although the patient will receive all of their aligners at their initial appointment, they should be scheduled approximately every 12 aligners (or 12 weeks). Patient’s shall be instructed to change their aligners once every week, but to slow down changes if they think compliance has been inadequate or they notice their aligners are not fitting correctly.
******************IMPORTANT******************
Patients should always wear their current aligner to their appointment. They can discard their previous aligners except for their current aligner and the past 2 aligners. (Eg. If the patient is currently wearing aligner 12 they can discard aligners 1-9 and should keep aligners 10, 11, 12.)
Appointment 1
Aligner Delivery Appointment: Schedule for 60 minutes
- Bonding of all attachments (and/or buttons if elastics are needed)
- Delivery of ALL aligners
- Review of home care and aligner instructions
- Send the patient an invite to download the myInvisalign App and review its basic functionality
- Review the Clincheck or “Treatment Overview” form and determine if/when IPR is indicated
- Schedule the patient for their next appointment. Schedule them for ~12 weeks
Appointment 2
Progress Check Appointment: Schedule for 20 minutes
- Check the Patient’s Invisalign progress by checking the fit of their aligners. Ideally, no noticeable spaces or gaps should be seen between the teeth and the aligners (see images below)
- Review their Clincheck and confirm if/when IPR is needed in the future
- Offer encouragement (and high fives), evaluate oral hygiene and review their oral health
- If you notice that the aligners are not seated:
- If an aligner is not seating on several teeth, a new scan is required and the case needs to be submitted for “Additional aligners”. A new Rx needs to be filled out and sent into Invisalign. This will allow better fitting aligners to come back to the office so that the teeth can move more effectively. The patient shall continue wearing their current aligner until the new aligners can be delivered to them.
- If an aligner is not seating on 1 or 2 teeth only, DO NOT take a new scan and have the patient continue with their aligners, but, reinforce the importance of compliance.
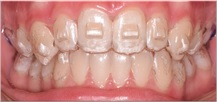
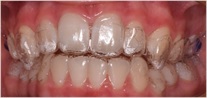
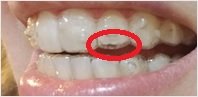
Proper fitting aligner Generalized Poor fitting aligner Single tooth not tracking
Continue 😊 Rescan ☹ Continue 😊
Appointment 3
IPR appointment: Schedule for 30-45 minutes
- IPR will be planned in the Clincheck for 1 of 3 time points:
- At aligner 13, 25 or 37
- It is very important to note at which aligner they require IPR so that:
- Enough chair time and doctor time can be scheduled for this appointment and
- So that it is done at the correct aligner
IPR can be performed within a range of 3 aligners before or after their indicated aligner stage. Eg. If IPR is indicated at aligner 13, you can perform the IPR at aligner 10, 11, 12, 13, 14, 15, or 16.
Appointment 4
Refinement “Additional Aligners” Scan Appointment: Schedule for 45 minutes
- This Scan will be scheduled at 1 of 3 time points:
- At the end of aligner 24, 36 or 48
- It is very important to note at which aligner they require a refinement scan so that:
- Enough chair time can be scheduled for this appointment and
- So that it is done at the correct aligner
- Upon completion of this appointment, patients should be directed to wear either their current aligner or the next aligners, nightly until the new aligners are delivered.
*****************IMPORTANT******************
If at any appointment the patient’s aligners are not fitting perform a refinement scan appointment! We need to get new aligners to get the patient back on track!
Appointment 5
Refinement “Additional Aligners” Delivery Appointment: Schedule for 30 minutes
- This is often is a straight- forward appointment. Sometimes several attachments may need to be bonded to teeth. Please check your Clincheck thoroughly to note the need for this.
- At this appointment ALL the Refinement Aligners will be delivered to the patient
- Patient will continue progressing through their aligners, similar to their first set
- The refinement “Additional Aligners” appointments follow the same path as the patient’s initial set of aligners
Appointment 6
Debonding and Retention Appointment: Schedule for 45 minutes
- Remove all attachments
- Update photos, scan and pano
- Deliver “retainers”- passive aligners to be worn nightly
Congratulations! You’ve Made it.
You have now completed Chapter 3 of 9 – When you feel ready, click the link below to be taken to the next chapter.