Let’s Make An IMPACT
Chapter 6: Interproximal Reduction Appointment
Taking your next steps
In this chapter, we will be taking you through your next steps to integrating Invisalign into your practice. This chapter is made up of 7 steps.
- Chapter 1: Getting Started
- Chapter 2: Submitting a case to Invisalign and using IMPACT
- Chapter 3: Scheduling and appointment sequence
- Chapter 4: The consultation
- Chapter 5: Aligner delivery appointment
- Chapter 6: Interproximal reduction appointment
- Chapter 7: Refinement “additional aligners” scan appointment
- Chapter 8: Refinement “additional aligners” delivery appointment
- Chapter 9: Debranding and retention
Items needed:
- Lightning strips
- GAC Dentsply Space Files with hand-piece on a slow-speed motor
- Floss
- Air/water syringe
- Saliva ejector
If you are comfortable performing IPR using your own technique please do so. Generally, IPR appointments will be performed only once or twice per treatment and IPR staging is generally towards the 2nd or 3rd clinical visit. For those who are new to IPR, this procedure does have a learning curve and it will take several times to become comfortable with it. Click here to learn more about IPR.
Step 1
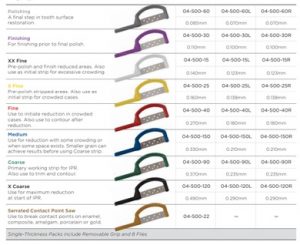
Prior to seating the patient, lay the Space Files on a tray according to their thickness as indicated on the instructions. See below:
Step 2
Open the Clincheck on the chair-side computer or have the “Treatment Overview” form in front of you so you know which areas will require IPR.
Step 3
Sit the patient back and gently floss between the indicated teeth using the lightning strips.
Step 4
Next, use the first Space File (Grey or Purple).
Step 5
IPR at all indicated areas ensuring you have completely broken contact. Apply even pressure on both the interproximal surfaces and once the file becomes passive, progress to the next colour/thickness. Use the air/water syringe and saliva ejector as necessary.
Step 6
Once you have achieved the appropriate amount of IPR, go back to the purple Space File and contour the interproximal contacts once more to capture natural anatomy of the teeth.
Step 7
Do not forget to note in your patient chart that IPR was completed.
Congratulations! You’ve Made it.
You have now completed Chapter 6 of 9 – When you feel ready, click the link below to be taken to the next chapter.